
So How Are You and Your Checker Getting Along?
Did my last post, Have You Seen Your Spellchecker Naked? reveal uncomfortable truths about how your spelling and grammar checker was letting you down? Before you give up on your relationship, try some checker counseling.
You wouldn’t dream of trying to change your spouse, partner, or significant other, would you? But as the word doctor, that’s exactly my advice on how to salvage your relationship with your checker—change its parameters and it will work better for you.
Most checkers let you personalize their settings to customize the types of errors they look for. You get to be in control in this relationship. You get to tell your checker which possible errors to flag and which to ignore. This post will tell you all you need to know about setting things right with your checker.
Take Control
Wait, you say. Why would I want it to ignore errors? Remember how I told you many checkers miss errors? Well, they also mark a lot of false positives—things that are not wrong. You can end up with three-quarters of your page underlined with squiggles. Selecting which errors your checker looks for means you focus on the most likely errors and don’t waste time double-checking artifacts you know are correct.
Grammar issues are more of a problem than spelling—most checkers spell pretty well (although they are homophonophobic). If you know your grammar is not superb, give your checker free rein. Conversely, if you are a grammar maven, set your checker to flag only those relative clauses on which you always err.
Now, let’s get down to it. How, exactly, do you set your checker? Once again, I’ll use Microsoft Word as my example. Though similar for Mac and PC, the options are arranged differently in their dialogue boxes. I’ll explain the items and note where they differ.
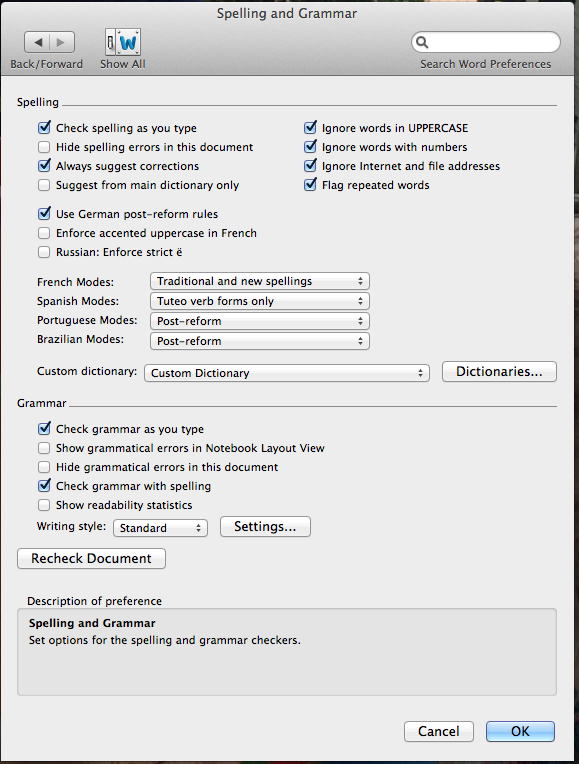
Word for Mac Spelling and Grammar Preferences
I’m using Word 2011 for Mac, but earlier versions are about the same. In your menu bar, click on Word and select Preferences. Choose Spelling and Grammar. A dialogue box that looks like this will open:
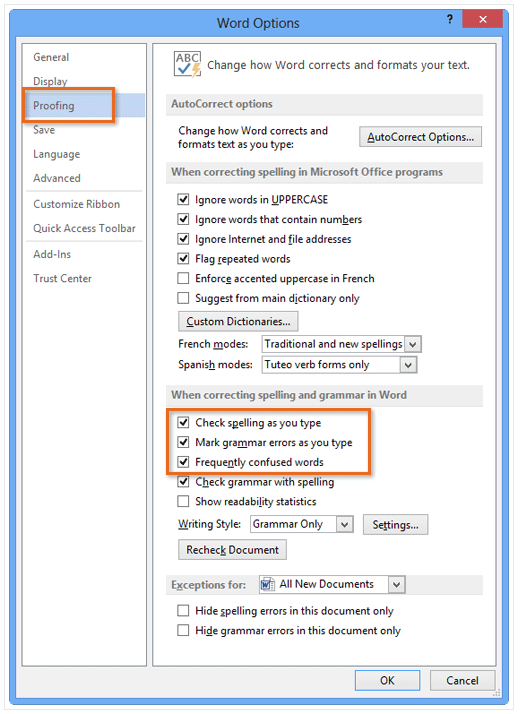
Word for PC Spelling and Grammar Preferences
I’m using Word 2013 for PC. 2007 and earlier may look more like the Mac version above than this PC version. In your menu bar, go to File, Options, and choose Proofing. Click the Settings button next to Writing Style. A dialogue box that looks like this will open:
Autocorrect Options
Word for PC has a section at the top called AutoCorrect Options… When you click on it, a new dialogue box that looks like this will open:

The same dialogue box is available to Mac, but not from the Spelling and Grammar Preferences window. Instead, in the menu bar, click on Tools, select AutoCorrect, and the dialogue box will open.
The AutoCorrect dialogue box has 4/5 tabs. Take a look at each and click on the options you wish your checker to take care of instantly when you type.
- Autocorrect: The options here are pretty self-explanatory. For example, you can make sure Word will capitalize the first word of every sentence. I don’t check this box because sometimes I don’t want to capitalize bulleted items and I get frustrated if Word insists on correcting my typing. A neat feature of this tab is the ability to add your own entries for things you frequently mistype. You can also add abbreviations for long words you’d like Word to type out for you. For example, type wtcc in the Replace box and Wilmington Technical and Community College in With. Click Add and then every time you type wtcc, Word will type out the full name. You can also list certain words as exceptions to the AutoCorrect rule.
- Math AutoCorrect: Check the box next to Use Math AutoCorrect rules outside of math regions to be able to automatically type math signs in your text without having to use Insert, Symbol from the menu bar. For example, you can type \sqrt and it will turn into the √ sign. You can add additional math signs to the list. Click on Recognized functions to see a list of math functions; you can also add to this list.
- Autoformat as You Type: This formats what you type to match a style you have previously defined. For example, once you format the first item in a bulleted list, Word will format each additional item you add in the same manner. It’s usually good to leave all of these boxes checked.
- Autoformat (PC only): Nearly the same as Autoformat as You Type, but changes are only applied when you press F3.
- Actions (PC only): This enables defined actions through right-click. Some actions are predefined; you can add others.
- AutoText (Mac only): This completes common greetings, signatures, etc. for you, saving you textstrokes. For example, if Word sees you begin to write Sin at the end of a letter, it will complete the word Sincerely for you. You can accept Sincerely by hitting return or reject it by continuing to type the word you originally intended.
S
Spelling and Grammar
Spelling
Back to Spelling and Grammar Preferences (first dialogue box, above). Move your mouse over the first set of checkboxes (Spelling on Mac). In Mac, as you hover over each preference, you’ll see its description in the box at the bottom. [There is no description box for PC.] For example, Check spelling as you type is checked by default, meaning that Word will automatically check your spelling, underlining misspelled words with red squiggles as you type them. If you don’t want to be distracted by red marks as you work, uncheck this box. When you finish working, reopen the dialogue box and click on Recheck Document near the bottom of the page, and Word will check the entire document for spelling and grammar errors.
Look at each item and check or uncheck the items, per your preference. I suggest you accept the defaults, except as noted below:
- To always avoid being distracted by red squiggles, uncheck Check spelling as you type. Or check Hide spelling errors in this document This is useful when your document contains a number of non-dictionary words and you don’t want to take the time to add them to your custom dictionary, but also don’t want to keep seeing the red squiggles. Caution: hiding these also hides any real spelling errors.
- If you have added additional dictionaries, such as a scientific or technical dictionary, but are working on a casual document, you may want to check Suggest from main dictionary only to avoid being inundated with useless suggestions.
- Ignore words with numbers is useful if you often purposely type word/number combinations. However, if you have long fingers and frequently mistype a number instead of a letter, you’d be better served to uncheck this box.
- Flag repeated words helps to mark instances where you type something like the the. However, if you frequently type repeated words on purpose, you may want to uncheck this.
When you type a word Word doesn’t recognize, it will give you the option to add it to your custom dictionary. It is a good idea to do this for names and words you type frequently, so you won’t see red squiggles each time. Caution: If you have occasion to purposely misspell a word, do not add it to your custom dictionary, or Word will never again flag that word if you mistakenly misspell it.
Grammar
In the second section of checkboxes (Grammar on the Mac), I once gain suggest you accept the defaults except as noted:
- To always avoid being distracted by green squiggles, uncheck Check grammar as you type. Or, check Hide grammatical errors in this document.
- If you have chosen not to change what Word has flagged as errors but later want to see a document without green squiggles, check Hide grammatical errors in this document.
- If you want Word to check spelling, but not grammar, uncheck Check grammar with spelling. If you later decide you want your grammar checked, recheck this box.
- If you check Show readability statistics, Word will analyze the number of syllables per word and words per sentence to calculate both the readability score and reading level of your document. These are presented in a dialogue box after Word does a full check of your file. The higher the readability score, the easier it is to understand the document; a score between 60 and 70 out of 100 is preferred. For reading level, each whole number corresponds to a grade. For example, if the score is 7.0, a seventh grader can understand the document.
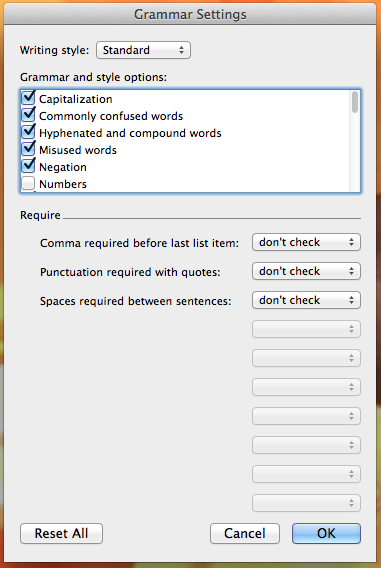
Writing Style
Beneath readability statistics, you’ll see an item called Writing style. Five styles are supported: Casual, Standard, Formal, Technical, and Custom.
- Casual writing is writing you do for yourself, friends, or family—diary entries, journals, reminder notes, shopping lists. It has no rigid rules. Contractions, slang, colloquialisms, and figures of speech are acceptable. Syntax and tone are conversational. Sentences are usually short and simple, often written in first person.
- Standard writing is Standard American English (or UK or Australian English), French, or whatever language you are using. For most of my readers, Standard American English is how you’ll need to format your school papers, articles, blog posts, stories, and original work you send out for publication to trade magazines and journals. There are specific rules for spelling and grammar. Depending where you are publishing, style rules vary. Contractions may be acceptable. Slang and colloquialisms are not. Syntax is based on correct sentence structure and may be written in first or third person.
- Formal writing is used to present and support a point or argument in peer-reviewed publications, scholarly papers, or theses. References must be cited. Syntax and tone are serious with literal meanings. Sentences are generally longer and more complex; first person is rare.
- Technical writing involves communicating specific information in a concise, precise manner. It conveys instructions, explanations, or directions, often in science and tech fields. No flowery language is used; basic spelling and grammar rules apply. Syntax is straightforward, concise, to the point, and may involve bulleted lists. Sentences are short to medium and simple, nearly always in third person.
- Custom is reserved for your individual projects. Click the custom tab and set your parameters.
When you click Settings…, a new dialogue box opens, showing the default settings for each style.
It looks like this on Mac:
and this on PC:
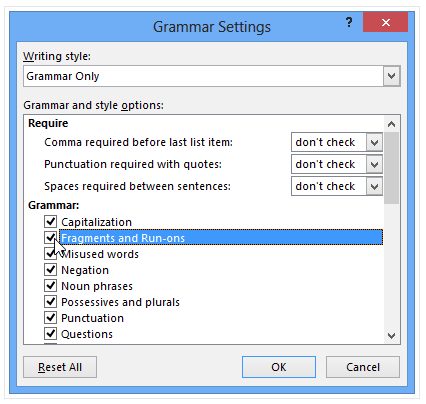
Switch back and forth among the styles to see the different types of errors they flag. For example, when you select Casual, Word does not look for clichés and colloquialisms, but when you change to Formal, those boxes are now checked. You can find an explanation of each Grammar and style options item here (scroll down a bit).
I suggest you choose the settings you are most comfortable with and select those as your own Custom style for general writing.
Where it says Require, tell Word how you want it to deal with
- the Oxford (serial) comma (apples, bananas, and oranges OR apples, bananas and oranges) [Oxford is preferred in formal and standard writing; none in technical and journalistic]
- punctuation with quotation marks (…Frost’s poem, “The Road Not Taken.” OR …Frost’s poem, “The Road Not Taken”.) [inside is preferred in US text]
- the number of spaces after a period (1 OR 2) [Either is acceptable, but 1 is preferred in modern text]
Finally, Reset All does just what you’d think: it resets all the parameters to their original defaults.
I hope you and your spelling and grammar checker will be very happy together. Comments?

Let me know if you received my first comment: this is excellent information!~
LikeLike
This is the first comment from you on this post. Thank you!
Susan
LikeLike